
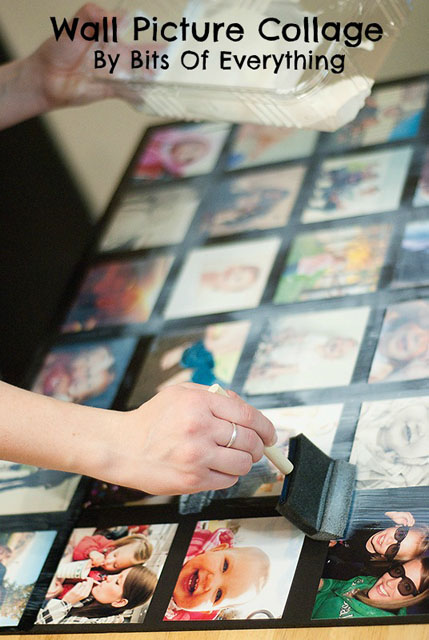
I have been wanting to hang something on the wall in my kitchen ever since we moved in. Between Emily and I, we finally dreamed up this Wall Picture Collage after looking at lots of other people’s photo collages- and I love the way it turned out.
Here are all the things that I bought.
(all found at walmart)
This entire project was under $20. My kind of project!
*pictures you want to use (I had free prints from Costco)
* 2 20×30 foam core boards (I got two black ones $2.88 each)
*poster hanger thingies ($2.44)
*foam brushes ($.97)
*double sided tape ($3)
*mod podge (I already had some)
I think it’s adorable!! You did great!
I did it as a collage on a 20×30 foam core. I cut photos around bodies just to fit in spaces and fit them all together. It was a lot of fun and got a lot more photos on than using the borders but a completely different look. I did not preplan spaces, etc. Ijust let it put itself together.
My photos are still wet, but seemed to have bubbled a little. Is there a step that I am missing or will they flaten once dry? Should I do more than I coat?
if you modge podge the board lightly and then while it is wet – modge podge the back of your picture & adhere. Do that for each pic. There is a flat scrapper tool you can get that you smooth over each item and gets the bubbles out. Let it dry well. Modge podge over top. I’ve done this for several furniture pieces that I’ve ‘funked ‘ up and added pictures and paper to….
Hello
Please i just took up frenchies puppies breeding as a hobby after my mom passed away because they were her favorite PUPPIES. Despite the fact that they are very intelligent, am finding it very difficult getting them to mate.
For any information CLICK HERE frenchies puppies for sale .THANKS
Where did you purchase the ruler?
the ruler is a scrapbook paper cutting ruler. You can get them in most craft areas that have scrapbooking supplies.
Sounds like what I did in my 4 yr olds room with wall paper. It was Scooby-Doo, & I couldn’t wallpaper the whole wall b/c we were renting, so I cut out the figures & put them up!! He luved it & made for easy clean up. But, I really luv your idea…..I’m gonna try this!! 😉 Thank U^^
Good idea, creative!
What I have been looking for. Thank u
This is wonderful and I am working on my first one right now. A couple of things. First I have this really cool tool for lining things up exactly. It is an Easy Square,Jr. It is a clear lucite square with inch marks (and smaller in between) in black print and allows you to align each piece perfectly. I have been using it to setup margins and align pictures I have taken and glued them with Mod Podgr to art canvas.
Next, will the Mod Podge last for years to come without yellowing or flaking? Thanks for sharing this great idea!!
Please i just took up frenchies puppies breeding as a hobby after my mom passed away because they were her favorite PUPPIES. Despite the fact that they are very intelligent, am finding it very difficult getting them to mate.
For any information CLICK HERE frenchies puppies for sale .THANKS
Hola soy lili de Argentina.
Vi tu collaje, el único explicado, me encantó.
Busque una base pero es más.grande de lo que imagine pinte la base 3 veces presente las fotos y las pegue. Ahora está armado sobre la mesa hasta colgarlo.
Cuando lo vi desde arriba subí unos escalones y sentí un bienestar tan grande una alegría profunda. Había hecho el proyecto que tenía hace 9 años.
No crei que me sintiera también.
No está perfecto pero esta muy lindo.
Y vos fuiste mi inspiración.
Al llegar mi esposo dijo que lo colgariamos mañana en una pared entera que no tiene nada.
Muchas gracias por ser la única que explico su trabajo.
Bravo por ti.
Ha errores “hasta otoño,?” ” que es lo que hace?” Y al llegar mi esposo dijo que lo.pegariamos mañana.
Pregunta: que es lo que compraste como base para pegar las fotos
Super cute. I’m going to have to figure out which wall I want mine on now. 🙂 (Since the majority of the walls in my house are completely bare, it will be a tough decision! They all need something!)
WAY CUTE Cali! It think it looks AwEsOmE!!! Now we might have to do one for me! ha ha! 🙂
Super cute! I love how it is on a foam board instead of wood. That would be a lot lighter. Now I just need to find some time to make it. 🙂
i think it DOES look perfect! great idea using the foam board.
Oohhh-I like this a lot! Good idea.
I love this now i know what to do with my grandmas pics of when she was small and on up. Perfect!
How did you hook your foam boards together? I already bought my boards to make this (even though I have no clue when I will get to making it!)
I have the same question
If you get poster hangers from Command Brand that are damage free those work really well. You have to put them on all four corners of both boards and line them up and stick them to the wall. Looks like its one big board now. Hope this helps.
You could use toothpicks also. Stick them into the sides of the boards and press together.
I love it! What a great idea to give as a gift!
It is realy nice thanks for sharing this!! love it!!
I love it! Beautiful job!
I would do the toothpicks thru the center idea but also get some black duct tape and tape it on the seam in the back and a few across for extra support.No one will see the back anyways > :0)
I wold also add a second coat of the modge podge and lightly sand it between coats to eliminate the ridges. then spray it with a clear coat.
Another option is to use Resin. On some plastic or large paper to protect surfaces, lay out the project. Pour enough resin in the center , tilt the project all about to cover and then let it self level out over the picture. Cover or TENT over it to prevent dust particles etc. and let it dry to a hard finish. —Nina M.
Wow.. I can’t believe you two just dreamed this up! It looks so good! Your professional pictures go great against the black! I can’t wait to see it in real life next time I come to visit so I can look real good at each picture!
Awesome! My fav project of you guys’ yet! 🙂 I would LOVE to make one of these for our house! I’m so terrible at actually printing pictures- this would be good incentive!
really pretty. the photos look great!
megan
craftycpa.blogspot.com
I love this. I just came back from Hawaii and would love to try it with our vacation pictures.
I am going to put all my university images from 1st semester to 10th. Really a cool idea
So cute! I would also like to know how you held the two foam boards together. Or did you just hang them up next to eachother without them being connected?
Angela- I just hung the two next to each other- super close so no wall shows between them! 🙂
You said you purchase picture hanging thingies 🙂 can you be more specific? What did u use to hang the foam board? Thanks!
LOVE IT! I saw it on your other blog and am super glad I came over to this one 🙂 Now I’m going to find some pictures and make this, plus enjoy all your other ideas! Thanks Cali.
Soooo cool!! I love it! I bought my first Mod podge a few days ago, and I didn’t know what to do with it! This is an exellent idea!
Wow, you posted this in April and I just found this picture pinned on Pinterest! I loved it, so it brought me to your blog. Sooo glad to have found your blog! Looking forward to your new posts!
Love it! Can’t wait to create 🙂 Thanks for the idea!!
I need to do this for my MIL for Christmas!
This looks like such a cool idea for holiday gifts. And I think I feel some inspiration coming on. Thanks for the post!
CUTE IDEA! Thanks for sharing!!
I think it IS perfect! Love it!!
That is so adorable! I am totally going to steal your idea, if that’s ok 😀
-Jade
http://www.jadesteckly.blogspot.com
this is fantastic!
thats awesome!! i should try one
Awesome idea! I love mod-podge!
Looks great! Found this on pinterest! 🙂
threemangoseeds.blogspot.com
This is such a cute idea! And so easy! I love easy projects. Definitely going to give it a try.
This is great! I was looking for an idea of what to get my parents for their wedding anniversary, but this DIY sounds way better as far as gifts go. 🙂
I love this Cali! I’m making one as we speak!! Thanks for the great idea.
Brilliant! We unexpectedly ended up with 50 extra prints from our Shutterfly order and not enough frames. Problem solved 🙂
Excellent way to display multiple pictures without using a billion frames. I will be doing this in the near future! Thanks for the wonderful idea!
Oooh, I love this! Thanks so much for sharing. A while ago I tried a similar concept by just attaching square photos in a collage using double sided tape…and it looked great for a couple days…until the prints started falling off the wall. This is the perfect solution! 🙂
Perfect idea! Hey, if you ever run out of mod podge again, just mix 3 parts white glue to 1 part water. Problem solved.
Saw this on Pinterest! LOVE this idea! Thanks for sharing!
this is a great idea! how did you put the two foam boads together?
Awesome idea! I’m a prof photog and use foam core all the time. You can order custom cut/size foamcore online from online frame companies like American Frame in black or white
It’s awesome! And I don’t see any imperfections for what it’s worth. Very cool idea! pinning it!
I like it. I think you should do the entire wall.
It looks great! I really like it!! I so have to steal your idea (with proper credit, of course) and do the same at my house!! 😀
absolutely gorgeous!
Someone pinned this on twitter and I LOVE it!!!
Great! I love this idea!!
Love this!
Love it! I’m putting this on my priority “to do” list. Thanks for sharing.
I Love this!!! I’m going to do it this weekend. Thanx for the great idea.
This looks AWSOME!!!!! Great job! Can”t wait to try this.
I love it!! We have very bare walls and I’ve been trying to figure out what to do with them. I’ll have to try this!
You could totally go over it again with the matte mod podge and it will dull it a bit. I’ve done it a few times on things I’ve done other places and they only had glossy. Super cute Cali!
Love it!!
Wow! Such a simple idea, yet I never would have thought of it! Your layout is beautiful and keeps it from looking too cluttered.
I’m not sure if the other commenters said this, but you can email Amy Anderson at modpodgerocks @ gmail. com and she’ll answer your question–I’ve asked her several questions, and she does indeed love Mod Podge 🙂
Oh I love it:)! I am sure you don’t mind me borrowing this…this is such a great idea to do something with my gazillion photos! Thanks so much for sharing:)
I have gone over shiny mod podge with matte before, and it comes out just fine! I did it on wood, though, not pictures.
Saw this on Pinterest and am so glad that I came to your site. I’ll be doing one today. Hope it’s as good as yours! Thank-you. 🙂
Did you Mod podge over the entire thing or just the edges of the pictures? I guess I’m asking if you covered the whole picture? Super cute idea! I might do this with wedding pictures. Easy way to display pictures from one event without a billion frames!
This is such a great idea! Great way to do something with all of my extra pictures that are just sitting in boxes. Thanks for the idea!
You used real photos? I’ve been decopodging photos to wooden blocks for years and I always use color copy paper because I assumed the modpodge would gum up the photos… It doesn’t?. Wow. Nice project!
I love this idea! I was just saying the other day how expensive it is to hang pictures. I have a wall that will look perfect with this on it! Thank you so much for this idea!!
Great job! Thanks for sharing!
Awesome idea. Was looking for a way to hang lots of photo’s without putting a bunch of holes in my walls! This is PERFECT!! Can’t wait to try this!
I just tried this and I used the matte mod podge and it is all streaky…it looks great except the streaky part. Did this happen with the gloss kind? Also for other that want to do this…put the double sided tape all over the back of the pictures…mine are bumpy in the middle. Luckily this was a small board so no biggie and hopefully my next one will come out better! great idea though!
I love this idea for all my leftover pictures that aren’t in my scrapbooks…..sure beats them sitting in a box! GREAT idea and thanks so much for posting this!
LOVE this idea! I think I’m going to do all my pics in black and white though.
Love it! I think I will do this with only pictures of my son and post them in chronological order to show how he has grown. 🙂
I love it! It is adorable and so fun………..you are right, the mod podge over pics is scary, isn’t it? LOVE it……….well done, creative one!!
I think it looks great, it’s the imperfections that make it all “yours”.
Love it! question, how’d you hang it up? what’d you use? thanks for the tutorial!
that is super cute! Love the pictures… thanks for sharing! & I love this font!!
I did this project last night and I love the results. Thanks a lot for posting it.
Where can you purhase foam board? I’m excited to try this with several smaller boards on my stair case. Love it!
Love your project. Am hoping to follow your directions and try something similar for my daughter’s dorm room.
Awesome job. It really looks great and what a blessing to see your fav pics every day. I must do one for my fav pics. Thank you so much for the idea and pattern.
I think this would be great as a progression of my kids pictures from birth to current age or the same with anything – changing seasons of the same place. Good job!
Thanks for this, I now know what I will do with all the pics of flowers I’ve taken over the years!
I have a similar one that looks the same but I paid $40 for and is wood. Love that you made it yourself! And I LOVE mod podge!!! Great idea!!!
With the wood is it any different from the foam board? I am working on a Father’s day gift but I would love to use wood instead of foam, is there anything you did different?
I LOVE THIS! You have inspired my next project!
omg i love this 🙂 i must do it sometime!
What a fabulous idea for those extra pictures! Wow! I am passing this off to my daughter. Great way to commerate so far 3 Komen 3 Day 60 Mile Walks!
PS…Thank you to Pinterest for connecting me to this blog…great ideas are found here!
LOVE IT!!!! I am always buying those multi-hole frames at the craft store. This is SO MUCH better!!
Lindsey @ ErieFamilies.com
Saw this on Pinterest! LOVE IT! I am so making this tomorrow! Thank you!
I need to try and do it. I love it. 😉 Amy
Will this work on a piece of wood as well. I have been wanting to use the crackle paint and make a “frame” but with just one picture. Thanks
That is such a great idea!!! Love it! I am going to have to get all my pictures together now and do this. Thank you for the brilliant idea!
Love it! :))
Do you know if it will work with regular paper?
I love it!! Think I am going to try it for my girls’ room!!
What a great idea! Thank you for sharing
Found ya on Pintrest!!! WHAT A great Idea!! I love it!!
I THINK THIS IS AWESOME. I HAVE BOXES OF PHOTOS THAT THIS WOULD BE A GREAT IDEA FOR!
hi,
I wish you had twitter so i can follow you guys. What do you call the font used on your blog? it is so cute 🙂
-Elsie
Found this on Pinterest! LOVE it!
I love this idea! My teen kids take tons of candid pics and then post them to FB where they stay hidden in cyberspace. I’m planning on having them tell me which pics to have printed and surprising them with these in their rooms. 🙂
I like this idea lots!! I can see using it in so many different ways! Looks like I may have some work to do before Christmas!
Super idea! I just came across this on PInterest! Love and repinned! I am so going to do this when my baby is a little older.
http://pinterest.com/picsgirl/
That is wonderful-great job. Where did you buy the foam core-the only one I can find is very pricey. Thanks
AHH. I love it! it looks so good! Great job
Thats cute…. It doesn’t mess up the pictures?
Great idea! Thanks so much for sharing – next project on my list!
I love ideia!
It turned out beautifully!! Congratulations!
OMG I LOVE IT! I am so going to do this!!!!!
I Think I’ll try this with black & white pics!!
Very Cute! I want to try this!
I stumbled upon this when a friend posted it on pinterest. And I love it! I’m so trying this when I get a day off. Thanks for the great idea. What do you think about the images cut into different sizes and interesting magazine clips or scrapbooking materials to add to the idea?
I’m not sure if I missed this, but what is the double sided tape used for? I understand the command strips are used for hanging the posters to the wall, but I don’t see where the tape comes in. It’s a great project btw, and I will be making a similar one as a gift to my family for the holidays! Thanks for the idea. 🙂
to attach the pix to the board 🙂
Love it…I need to make me one now! 🙂
Thanks for posting this. I took pics to the local store to get a price on having them framed to look exactly like this and it was going to cost me $500 because of all the custom cuts. Now I’m going to do it myself.
Thanks
i love it! now i know what i’m gonna do with some of my pics. thank you so much.
Great idea! Could you also use the Modge-Podge to glue the pictures to the foam to eliminate the tape? I think I might try it that way, just wondering if anyone has tried that already!
Ok, late to the party, just found on Pinterest- How do you hang it on the wall? What do you use to hang it?
Fantastic! I love it, but I have a question too. Do the photos smudge at all when you first put the modge podge on (when brushing it around wet)? We’re your photos professionally printed or printed at home with photo paper? That might make a difference!
I love that idea!!!
the best idea EVER! love it
I also LOVE it. Going to give it a go. Kids love looking at pictures of themselves. As do there girlfriends!
“I have been wanting to hang something on the wall in my kitchen ever since we moved in”…. this line roped me in, I have been thinking the same for the past 3 yrs !!! 🙂 i am defenitely trying this . it will be my first with modpdge, hope it turns out fine…. Soumya
I know what Im doing this wknd, because i got free photo prints from walgreens recently!!
This is wonderful!! I have been trying to figure a way to creat a frame for my kids school pictures…..this is going to work great…thanks!
I LOVE IT!!!! Starting it tonight 🙂 Such a great idea…
> Hey, nice idea.. i used it 3 years ago 😛
check this out 🙂
http://vimeo.com/2950896
wow, thanks for the ” step by step ” help.
this is a really striking piece!
can’t wait to try one myself
😉
I love it!!
Thanks for the great ideas. Shared on my blog conniemfink.blogspot.com
I was wondering if anyones boards started to bend? After my first coat it started to bend and I was super sad. Just wondering what anyone else had the same problem.
Your project is fabulous!
If you coat the back of your photos with Mod Podge first and then stick them down you wont have the bumps from the tape on the back. I just like the idea of the whole surface being glued down. I have also found that if you coat the whole blank surface with the Mod Podge first and let it dry, the pictures will lay very flat when you put them on.
To Anonymous: If you coat both sides of your foam board and let each side dry completely, it should dry flat. I usually work on canvas but I think the idea is the same.
With you mod podge did you use the gloss or matt?
Love it! I will have to try it! Thanks for the great idea!
I think it’s perfect!
Hey I was on pinterest and checking out wall hangings and your blog came up! I was so excited that it was yours and that I recognized all of your pictures! I loved this collage so much and I love it even more that it came from my dear cousin! Love you! Lisa
I like it LOTS… I am going to make something. Maybe a ‘theme’ board with my son’s pictures from bootcamp graduation. Thanks!! – Kandy
This is awesome! I’m going to the craft store today!!! Thank you for sharing your wonderful idea 🙂
Cant wait to try this… Awesome Idea.
i love this and can’t wait to do this for my new house.. I was wondering if it would work on canvas or wood?
I’ve done many projects like this on wood…works beautifully! Add some more personal touches with a quote or names! Check out my website: http://sarahwhitson.uppercaseliving.net
I absolutely LOVE this idea and am going to try this 🙂 Thank you so much!
LOVE this idea! Thanks for sharing 🙂
So, 2 ideas I thought of when I saw this….My daughter is getting a little older and her little wooden name letters are too young for her..How about cutting the board to the shape of a C (her initial) and then, instead of black, pretty, heavy duty wrapping paper adhered to the foam board. Then the pictures….just a thought…oh and maybe cute little frames, think tops of hearts, around some of the pictures…LOVE IT!!! Thanks for the idea!!!
Dammit this is a great idea….!
I love it. Surprised the ModPodge didn’t ruin the pictures!!! Very cool idea.
I love this idea and I think it would also be a great idea for seasonal pictures too. I have a ton of beautiful and sentimental Christmas pictures of my 3 girls over the years and this would be a very economical way to use them for holiday decorations. At that price you could go crazy! 🙂
I love this idea! I think I could so do one of these for each room! I can change the size, shape and color! Hobby Lobby has a lot of different colors. I cant wait to get started! Thank you for the idea!
with using paint brushes instead of foam brushes work?
Very nice and creative! Totally gonna try it!!
Awesome idea and I think it looks fantastic!!!
LOVE IT!!!
That’s a great idea! I’m wondering though if it would work on some painted plywood. We’re military and move a lot, so I’d be too afraid of movers crunching it. 🙁
it will work on plywood!
Where can you get foam core boards for cheap? All of the ones I am finding on the internet are pretty expensive.
That Is such a great Idea!! Going to share it with my 16yr old daughter and see what she thinks, she has so many picture.
This turned out so cute, When I do mine Im not going to have the pictures so straight,I like to have them all over and in random positions and angels. Thanks for such a wonderful idea to do with all my pictures.=)
*angles
if you modge podge the board lightly and then while it is wet – modge podge the back of your picture & adhere. Do that for each pic. There is a flat scrapper tool you can get that you smooth over each item and gets the bubbles out. Let it dry well. Modge podge over top. I’ve done this for several furniture pieces that I’ve ‘funked ‘ up and added pictures and paper to…
Just curious…someone else asked if it would work on canvas just as well…I imagine it would, but wanted to re-ask that question (didn’t see an answer…it there was, I am going to use the excuse that 3 kids have stolen my brain cells. 🙂 ). I have some canvas art from Kirklands that I’d like to repurpose. Thanks!
Loved this we used it and then added some scrapbook paper and stickers to personalize it thanks for sharing !!!!!!
I love this!! What a fantastic idea!! I can’t wait to make one!
OMG, I have so many pictures. I have 6 children & high ceilings in my living room. I’ve been wanting to do a big collage forever but finding a simple way. Do u think I could use a big piece of 4×8 ply wood or should i attach the foam to the ply wood?? What do u think?
OMG, I have been looking for a solution in regards to a BUNCH of old photos around my house…they’re piling up but thanks to your idea I am now going to create several of these for the house…one for the office, one for my son’s room, and one for the entryway! THANKS!!!
This is why I love pinterest!!! Genius!
You can get the foam board at Walmart. I think I paid about $2.88 for a 20×30
I love this idea. I am a digital picture taking junkie and this gives me an idea now! I can so easily see me doing this for different sporting events that my kids are involved in! You did a great job!
Great idea! I have been doing this for years. Only difference is that I use a canvas for the background. This way I can spray paint the canvas a color that compliments where I will hang my collage.
What a great idea – you did a beautiful job 🙂 🙂 I’m going to try this for sure!
HI THIS IS AWESOME!!! I LOVE WORKING WITH MY PICTURES AND I AM GOING TO DO THIS. THANK YOU SO MUCH FOR SHARING YOUR CREATIVITY!!
SYLVIA
SDMGZRCKS61@YAHOO.COM
Wow that is so super cute and I love it…………..
I absolutely love this! I tried it today, but added decorative scrapbooking paper for decoration. I was worried because the paper started to ripple. I actually love that it did this because it looks like ribbon! Such a great idea! Thank you for sharing it!
I have seen this done on an old card table and given as a wedding anniversary gift. Do you think you could follow the same rule of thumb that you did with your work?
it is lovely! thanks for sharing!
I love it! I’m thinking about trying it… I have a 13 month old and i have so many pictures and frames cost way too much for all of them! Thank you for sharing!
How to hang it without ruining it?
I love this idea and its very creative. I feel that Mod Podge, might not be the best though. Using a Medium or a Heavy clear acrylic gel medium would make them stick better (no tape) and it would be more archival and last longer. Mod Podge puts a coat over the photos and it makes them “hazy.” The Gel medium wouldn’t do that, and it won’t make them shiny. It will harden better and you’re project will be archival and last longer!!!
Where would you buy acrylic gel medium?
Thanks!!
I found this idea on Pinterest and am just waiting for my first board to dry right now! I pulled out lots of old pics that I haven’t used in any scrapbooks, including some with our extended family. Thank you soooo very much for sharing this idea…I LOVE it!!! 🙂 Also, thanks for the tip about the Command strips!
Love the baby legs on the right! :0D
what a brilliant idea. Love it! My next project
Love this, I am going to try it!!!
i like i will be doing this one with all the grandkids
UGH! I did this as a last minute birthday present for my mom. I stayed up last night spacing all the picture and the modge podge smeared the pictures! I thought i was just pressing down too hard but it doesn’t go evenly if i don’t. I give up on this. have to go buy something else i guess
My parents are having an 80th birthday party in May…all of the kids, most grandkids and greatgrandkids will be there….this will be a PERFECT project to make and display at my parents so they can reminisce about the milestone and family gathering! YOUR’s is Beautiful! I love the way it looks! If its not perfect it shouldn’t be because it looks perfect to me! :o) ~Renee
did your pictures curl up? Mine did. 🙁
Thank you for sharing this idea. It’s great!! I moved to a new place with tons of wall space. Never found any pictures I liked that were affordable. I’m digging in my photos so that I can do a couple of collages like yours. Will be nice to pass smiling faces and good memories, especially on days so bad you wonder why you bothered to get out of bed!
$20 is expensive! I had the pics and I got everything at the dollar store (plus homemade modgepodge from dollar store glue). Mine only cost $5.
Definitely going to try this!love it
I love this but if I use a good double stick tape I don’t think I’m Mod Podging over the pictures. I don’t really care for Mod Podge. If I had the money I would use wood and put resin over the top.
I think it’s wonderful and I’m glad that your helper got to see it through from start to finish. It doesn’t matter how it turns out, it’s a good time together, and a lesson to learn that it’s the fun that matters.
I intend to do this myself! I have lots of pictures that are waiting to “live” on my wall 😉
I scanned all of my pictures first for a digital family history, and the ability to have access to any one given picture I may need in the future for any reason.
I was wondering what kind of ruler that is you used? And where can I find one?
Thanks so much.
Love this project!!
love this! my hallway looks so empty, this will be perfect!! Good job, i just hope i dont ruin my pictures in any way!
Nice job! I never thought to make a mural on the wall like this.
Hi there! I find it more than perfect and I intend to try myself, as I was saying …;-) CONGRATS!!!
Neat idea, certainly beats leaving photo’s all jumbled up together in a plastic bag,as I’m guilty of doing
AWESOME!!!!!
Has anyone used the matt modge podge? I am going to do this project and I don’t know which one to use.
i think i’m going to try this with pictures i print off my computer in black and white on computer paper!
Make sure you use a laser printer instead of inkjet or you’ll get problems with the ink streaking.
I did one with pictures printed from a copy store on regular paper, and they didn’t do as well as the pictures I printed off at costco.
Totally just had this same problem… If I give it time to dry with the inkjet pictures will it not streak?
Gorgeous work! We could do this with Intragrams!
Team Craftwell
blog.craftwellusa.com
I love this! I’d make it and maybe try framing it for added sturdiness. (We move a LOT)
really love this collage !! it would be such a lovely gift, im gonna try it
Would this project also work with white poster boards? I’m confused about the different ways mentioned in the comments and don’t know which to try. Mod Podge of course but a gel and resin were mentioned. 🙂
can u do this on wood if so would there be any changes o should make.. love ur idea just thought about ndoing something a little more sturdy
I used the Matte modge podge and there is no glare. I also just got one big black board from hobby lobby rather than buying two.
I really like this!! I have been trying to find a way to frame some things for grandparents without spending a ton of money and this is perfect! It will make Christmas presents, at least part of them, super easy! Thanks for sharing!
Great Idea!!My next real project for sure. Thanks for sharing 🙂
I just did two boards last night, and they’re amazing! So, I wanted to say thank you for this! I found some REALLY old pictures that we haven’t looked at in years, and brought back a lot of wonderful memories!
I love this idea….
I really want to try this, but I guess it would not work on the photos I print here at home on my ink jet home printer. I would need to have the photos professionally printed so that they wouldn’t run when I apply the modge podge glue. Right?
Please tell me how to keep the foamboard from warping. It’s so cute and mine warped so bad it wouldn’t hang correctly.
I did this with only one board and used glitter modge podge and it turned out very well. Such a great idea! Thanks!
Love it! I’ve got all the supplies and pictures. This is my project for the weekend! hanks
I made 3 boards. One with the 4×4 prints all the way through, and two with horizontal and vertical pictures of x6 prints. They all look fantastic! I got a great deal on prints at Walgreens, and awesome coupons to use when I got the boards at the craft stores. The stars aligned perfectly!
Awesome! So glad it worked good for you!
Definitely going to be making one of these! !! Or two 🙂 Thanks for sharing such a fun and easy project for anyone to do! *I’m your newest follower* .. Can’t wait to browse the rest of your projects!!
Thank you SO MUCH for this idea. I love it! I currently have piles of pictures sitting in the next room (I had to move them so we had a place for guests to sit). I have no place to put any more frames, on the wall or on tables. What a great idea. Also redecorating the kitchen, so I might find a way to do both!
Thanks again!
This is AWESOME and I’m about to start mine right now. 🙂
I LOVE THIS! I am making one right now. Such a great idea. I am using it to display dance photos of my students in our waiting room. It seems so much easier than buying a ton of picture frames and trying to hang them in a straight row. Thank you for sharing.
This is the kind of thing I’ve been looking for. Thanks for posting 🙂
So excited to have found this on Pinterest! My nursery theme is the Family tree and I have over 300 photos chosen to put in there but wasn’t sure how to without frames! I LOVE this! Thanks!
Doesn’t the mod podge ruin the photos? Seems like it would smear the photo. I want to try this but afraid of spending the money and it get ruined.
The mod podge didn’t ruin my photos- as you can see. They were regular prints from Costco, and they turned out fine. I made some copies of prints for my mom and did this project, and those didn’t work so well. The regular prints should be fine!
Wonderful Idea. Looks absolutely fantastic. Thanks for sharing.
I wonder if I could make color paper copies of my pics and use the same technique ~ I have lots of older relatives I LOVE to make this for.
I did a color copy one of old pictures for my mom, and it didn’t work quite as well… I had some wrinkling of the pictures, since they were simply copies. She still loves it– but it doesn’t look as good as mine does with regular prints from Costco. Good luck!
I’m a scrapbooker! But it is too hard, time consuming and expensive to scrap every picture I take (and I take A LOT) so I think this is a great idea! Great way to display some of the extra pictures that don’t make it into the scrapbook!Definately going to try this one!
Awesome job! I’m hoping to try..thank you for sharing!
This is so awesome, this will definitely be my next project for my dull and boring wall. I just wanna ask if you used the two core boards, or you just used one? Thanks for sharing this! 🙂
I used 2 core boards that I bought from Walmart and just hung them close together. 🙂
Wow, this is such an awesome idea. I think I will have to try this out today since I have a stack of old pictures just sitting around waiting to get ruined.
Sorry didnt mean that this would ruin them, I ment that if don’t do something with them soon my almost 2 year old will ruin them
Thanks for the clarification. 😉 Hope it worked good for you!
So you can just use regular pictures? I was always told that you couldn’t mod podge glossy pictures. I want to do a collage for my best friends wedding gift with my MOH speech on it.
I just used regular prints from Costco and it worked fine for me!
Super cool! How are they holding up? Sometimes they peel or warp if you don’t get the image directly printed on like some companies do. When I did it myself I know it didn’t quite work out, but getting it done prevented this. I used these guys and haven’t had a problem. However doing it yourself is much less expensive. How are yours holding up and if well, what did you do so I can do it better next time.
OMG THANK YOU SO MUCH FOR SHARING
what is podge??? sorry for my english but i couldn’t find a definition for it?
Mod Podge is a substance like glue that works as a finish or glue. I have read somewhere that you can make it from scratch if you can’t find it where you are. http://www.babblingsandmore.com/2011/10/homemade-mod-podge.html
That is awesome!! I have a picture collage in my kitchen that I made using a HUGE cheap picture/poster frame that I found brand new at Good Will (gotta love that store!!) I like how you laid them out so nice and pretty. Mine doesn’t look horrible, but it definitely isn’t neat/organized/professional looking like yours. I am closing on my house in 12 days and will definitely keep this in mind if I find a nice space for this project. Not to mention it would be fun to do a collage of my pup growing up. Thanks for sharing!! 🙂
I did this on a large, old vintage wooden cabinet door and I am going to hang it on my wall. I painted the door dark brown, printed my pictures in sepia, and used matte modge podge. It’s still drying, but it looks absolutely amazing. Thanks for the inspiration.
how did you hang it up???
I love this SO much. I really, really want to make one. Thanks for sharing. You did a beautiful job.
~FringeGirl
my daughter turns 28 next month, gonna do one for her, from all 28 years , ty so much for the idea 🙂
I think it’s a wonderful idea. Great as gifts, too! I’m going to try it and I’ll let you know how it comes out. Thanks!
Just FInished Making one for my Mother-In-Law, Thanks! It turned out great!
Hi!
This might sound like a silly question but what’s another name for “mod podge” – Mat glue? I asked at the Craft store they had no idea what i was talking about it…
what did you use to hang it on the wall?
Just want to say great idea. I did try this, changed it up a bit. I used the Matte finish mod podge and it still has a bit of a glare. I think it would be best using the gloss finish, it would at least look like glass instead of a ‘finger smudge’ look glare. Just sharing.
You can do this using canvas and wood as well, if someone wants something thicker than the foam board.
wow such a great idea, you did great! Awesome!
http://blog.petitjoujou.ca/
Claudia
I love this, thanks for sharing. This would be a great gift too. I might do this as Christmas presents this year.
http://uniquestylishpurses.blogspot.com/
Amazing!!!!!!!!! I am going to try this project
Thanks so much for sharing! I just moved in to a new apartment. I have so many pictures from years of travelling, but my landlord doesn’t like me hanging things. This idea works great as it doesn’t ruin your walls and you get to share your pictures 🙂
I think this is an awesome idea and I will be making some of these for my home and for gifts. Great idea thanks so much.
Any one know if it works with homemade mod podge?
Another way to do this is after you mod podge, use some ribbons and make it look like a bulletin board or like they are framed.
I love this ! Can’t wait to try it. I blogged about it and linked it right back to you here: http://muffinsandmocha.wordpress.com/2013/03/02/affordable-wall-picture-collage/ 🙂 Hope that was ok!
Just throwing it out there, this is a perfect way to display your instagram photos. I made a 4×6 canvas in a photo editing program and then dropped my instagram photo in, size the picture to 4×4 and get them printed anywhere
such a great idea! thanks for sharing!
It’s just AWESOME! I have a question though, I may have missed it but how did you fasten the two black foam core board together? Thanks.
You provide very nice information here and and thanks for provide this information and suggestion for you keep it up.
Going to give a try with different size pictures love it
It’s really nice and you provide very nice and you provide very nice about your kitchen painting and this is very amazing post i hope so better post and i like it very much and know more click here.
I just love it! Great job!
As of today I’m new Pinterest and this is my first look on this site and I love this DIY idea. Great Job 🙂 I will try this out I have lots of pictures.
I am making one now Thanks for sharing you awesome idea!!
After reading the various article in your site, I feel that I need more information on the topic. Can you suggest some resources please?
imperfectly perfect…love it….it was made with love…absolutely fab…have already PINned and has already been rePINed…thx for sharing…your idea is already being enjoyed by so many…xoxoxo
I love it so much I’m making one today!!
I absolutely love wall art, and if it contains photographs, so much the better. Lovely idea and one I will most definitely try myself.
LOVE THIS PROJECT! cant wait to try it with my creative and crafty 12 year old!
Love this! Thanks for sharing. I am currently making a “W” with my children’s pictures all over it and I have never used Mod Podge before. I wasn’t sure if I should just go over it or not but you have given me courage! Thanks so much!
I’m so excited to make this for my college dorm! It shall be perfect. Thanks for the idea 🙂
Super cute!!!
This was an awesome craft! I added some metal stickers to the corners to make it look like a closed frame! I will use this idea on foam Jerseys I found @ the crafts store for gifts. Thanks for helping create my first home craft!
I think it is absolutely perfect!
This is so cute, what a great idea thanks for sharing
I’m from Australia and I love this its fantastic. I do have a question what id mod podge and what is its purpose as I would love yo do this with my boys photos.
Thanks a bunch Kylie
You should consider doing another on below to make a bigger statement
This looks awesome! nice idea and could easily work with printed Instagram photos that come in the 4x4prints! I blog about creative ways to display printed instagram photos at printicular.com/printing-instagram and this is definitely a cool idea!
I did a similar project using a canvas framed with wood; first I painted a background color then taking several family photos, and scrapbooking letters and words. Taping them all underneath the pictures to the canvas then coating with Modge Podge. The canvas was inexpensive, the time I spent creating it was enjoyable and the response from my grandparents when I gave it to them was priceless! Great and creative project that has a lot of heart.
I love it! You may be able to take the glare off with some real fine steel wool. I know it works on poly eurathane to take the gloss away and give it more of a satin look. Maybe try it on something else before you try it on your beautiful collage. Love the idea….thank you!
I think it looks great I am going to do something very similar with all my nephew’s 5 by 7 pics I just want to leave a bit more black showing between pics thanks for the awesome idea <3
This is awesome! Will definitely copy this! Maybe with some other color foam board as well!
That is really cool and cheap to make!!
I came across this and fell in love!!!! I made this project tonight and it is my most favorite craft project I have ever made!!! Thank you so much for the idea 🙂
Thank you, thank you, thank you!!! This is EXACTLY what I’ve been looking for (and I didn’t even know it)!!!
Just moved into a new place & plan to go back to college next year and trying to minimize spending & items I’ll need to take.
I want to display a few posters, though, and I calculated it would cost around $300 to buy the posters (11×17) + frames. Printing (i.e. wal-mart/cvs) 8×10 photos and buying frames would cost about half that. I just can’t justify spending that much money right now.
Tried searching for collage frames and they are insanely expensive, not to mention the photo orientation is not what I want.
As a last resort, I did a google search for “cheap photo collage ideas” hoping to find something that didn’t look too tacky but was inexpensive and easy enough to make. Found your post and will definitely be making this.
Thank you!!!!
Good if you don’t live in a humid place! Gator board would work better than foam core. Foam core warps when its humid.
When I tried this I printed my own pictures out at home and my pictures smeared qhen I applied the modge podge 🙁 hoping my pictures dry overnight so I can finish it . Did you have this problem?
Made one all the way from Manila! Such a nice idea, thank you!
Hi, where did you get the foam core board? Thanks
Love It will be doing this for many of my pictures!! Thank You So Much…
I am going to make this for My Husband ( his Navy pictures) for Valentine’s Day!!
This is such a cute idea. I have only one concern. When I work with MP and paper, the paper usually buckels. Did you have that issue? Kudos on your bravery for using old MP. lol
-Hunny
Your photos look wonderful. Your directions are easy to follow and I can’t wait to get started.
We have a lot of precious photos, but we can’t frame them all. This is a great solution.
What a great idea- thanks for sharing. good job!
It looks amazing! Just curious how you were able to hang it up?
Ok, so I seen this blog and thought it was a great idea. I have a lot of pictures laying around and this was the perfect way to display them. I worked all weekend preparing what I wanted to display and have everything ready to spread on the Mod Podge. Well this is where I got scared, sorry to say. Reading some post is saying that their pictures curled or have ruined. Should I be taking my pictures in to have duplicates made before I continue? some are so old, I would hate for them to be ruined. Also, the post just states to tape the pictures down, however I have read elsewhere that the mod podge should be spread out on the board and then place the picture down. Not sure how to proceed.
Wow! I like this idea. You did a great job and inspired me too. I am going to try this soon….Thanks!
Just an fyi – I did this and my pictures were ones I printed out. The photo paper warped a bit. I did a thin coat and I think I’ll do another one to try and get them flatter.
I’m thinking thicker photo paper would work better!!!
I love this idea!! I have so many prints I don’t know what to do with! Thank you!!
this is really nice! i’m definitely doing it ! thanks for the wonder idea!
I’m really excited to try this!! Yours looks great! How did you measure out the distance between all the photos and make sure that they were spaced evenly?
I love this idea! But what exactly did you use to hang the poster?
I love it! Super cute idea
What’s up everyone, it’s my first go to see at this site, and post is really fruitful in support
of me, keep up posting such content.
Great idea!! Picture frames can get expensive and this is a fantastic alternative!!
I like the helpful information you provide in your articles.
I’ll bookmark your blog and check again here frequently.
I am quite cedrtain I’ll learn lots of new stuff right here!
Good luck for the next!
Hello~ I mod podged regular scrap book paper to foam board before and it totally warped the whole dang project! .. Did yours warp with using the regular photos?? I really want to make a couple of these for my hallway! And I love that it’s so cheap to make 🙂 Thanks!
We tried making one with pictures that were printed on regular paper, and they warped too. The pictures that are printed on actual photo paper are usually thick enough that they don’t warp. Good luck!
I made two last night and another today for my daughters for Christmas. Look fabulous but on each one theres a couple pictures just not sticking, so frustrating. Any suggestions so the pictures don’t lift…. and how do l fix it now that theyre coated? just LOVE this idea-thank you!!
How did you get the two foam boards to stay together? Did you glue them or tape them? This is an awesome project!
Why did you but mod podge ?
hi I have just seen this and think its brilliant. I would really like to copy the idea but……..can you tell me what I can use in the UK to replace the Mod Podge with thank you
I love it! love it! love it! I am going to save this project and try it myself and have all my little great grands smiling down on me and my husband. Thank you for this great craft idea.
Going to get the stuff now
i think this looks like a project I would like to do.
great idea
I’m making this right now. Super easy. I hope it turns out good!
Wow that’s a creat idea! 🙂 I like it !
Awesome job, Cali! Thanks for step-by-step process and pics. Will definitely try!!
Is your pictures cut 4″ x 4″???
This looks great. U gave me a great idea, for I have so many pics and it would cost too much to do frames, and new photo albums r $20 & up, and u can’t display them like this. Thank you
This is an awesome project for my home! Perfect!
But will do this project first as a gift to my mother for her birthday and since she is a pastor as well I am arranging a photo that includes each department of groups plus some close members of church…one family.
Thanks so much for this idea and now I can do the same to my own pictures.
If I use the mixture of water and glue instead of mod podge will it still work?
Where did you find the foam boards
Great idea!
Hi,
I love ur art work! I’d like to do something similar but in don’t know where to get foam core boards. I’m in Toronto, Canada would I be able to get it at a craft store or a diy store?
Thnx for ur help
I would skip the double stick tape and just use the Mod Podge to adhere the photos, then cover them with Mod Podge.
Neat & tidy. It’s perfect for me. Going to do the same but wonder I could get thr mod podge in my place. ^^
what is the mod podge for??
I have done two of these they are wonderful.
Can you use regular photos?
Awesome idea!!!!!!!!!!!!!!!! Cheap and artistic.
Why did u use two foam boards? At what point in the process were they stuck together, or were the holes cut into one of them and it was placed over the top of photos?
Hi Johno, she put two boards right next to each other on the wall (touching)
The photos are placed right on top of the boards and mod-podged on– no cutting of the foam board
Hope this helps
i think is the most adorable idea that anyone has had. Way to go!! I ‘m going to make one of all of my friends kids, yours is lovely
I absolutely love this idea! Especially the simplicity AND cost efficiency! I do have one question though, how stable is this? Knowing my luck I would move it and it would snap in half! Is it pretty durable?
You have even figured out how to make it reasonable and straightforward to peruse. You have some authentic work ability. Much thankful to you.
SEO Interview Questions and Answers
Awesome post.
Gostei muito da sua dica e criatividade, muito obrigado por compartilhar.
Vou tentar reproduzir aqui em casa.
Fantastic!
Enjoyed your post
Really Thanks For Posting Such an Informative Content… Enjoyed Reading It……
Thanks For Sharing Such an valuable info….
Hello there
SEO Link building is a process that requires a lot of time fo bitsofeverything.com
If you aren’t using SEO software then you will know the amount of work load involved in creating accounts, confirming emails and submitting your contents to thousands of websites in proper time and completely automated.
With THIS SOFTWARE the link submission process will be the easiest task and completely automated, you will be able to build unlimited number of links and increase traffic to your websites which will lead to a higher number of customers and much more sales for you.
With the best user interface ever, you just need to have simple software knowledge and you will easily be able to make your own SEO link building campaigns.
The best SEO software you will ever own, and we can confidently say that there is no other software on the market that can compete with such intelligent and fully automatic features.
The friendly user interface, smart tools and the simplicity of the tasks are making THIS SOFTWARE the best tool on the market.
IF YOU’RE INTERESTED, CONTACT ME ==> seosubmitter@mail.com
Regards,
Jannie
Thanks for Posting such an useful info…
We all love our grandparents and on their birthday, we can gift them a family wall picture collage so they can always feel that his/her family will always together and there are so many birthday ideas you can follow on the internet.
Thanks for the information. I really appreciate your efforts. Visit for customize picture collage to gift your loved one. Customize picture collage קולאז תמונות with no. of images on it.
thanks for this post its the best
thanks for this post
Vorrei condividere un’eccellente pagina sui verbi irregolari in inglese. Esiste un database completo di verbi, ad esempio: Read passato
Hi, I am going to travel to Dresden. Can you give me any advice?
we love this blog
Obrigado, é interessante, escreva mais, por favor. Você poderia revisar minha página, por favor? Learniv.com
Hallo, ich spiele Warthunder, du findest nützliche Übersetzungen ihres Wikis.
fine and enlightening post.
fournisseur de mobilier in cote d’ivoire
Thank you for interesting article. Také by mě zajímalo toto “špagety s kuřecím masem“
helo guys
Pouring the soupy paper mache into a bowl I let it cool for about a minute and then start tearing paper towels into small pieces. I use paper towels because they are easier to sculpt.
Hello
I did it as a collage on a 20×30 foam core. I cut photos around bodies just to fit in spaces and fit them all together. It was a lot of fun and got a lot more photos on than using the borders but a completely different look. I did not preplan spaces, etc. Ijust let it put itself together.
We do same day shipment, and tracking information is
provided as soon as shipment is made.
All products come with manual and most of them are still in box but not all are brand new.
These are not stolen and there’s a
sales document issued for each.
We also ship to an FFL for those who prefer it that way.
Please feel free to visit our website https://www.legitarmsdealer.com/
Hello
I did it as a collage on a 20×30 foam core. I cut photos around bodies just to fit in spaces and fit them all together. It was a lot of fun and got a lot more photos on than using the borders but a completely different look. I did not preplan spaces, etc. Ijust let it put itself together.
Hello
if you modge podge the board lightly and then while it is wet – modge podge the back of your picture & adhere. Do that for each pic. There is a flat scrapper tool you can get that you smooth over each item and gets the bubbles out. Let it dry well.
I did it as a collage on a 20×30 foam core. I cut photos around bodies just to fit in spaces and fit them all together. It was a lot of fun and got a lot more photos on than using the borders but a completely different look. I did not preplan spaces, etc. Ijust let it put itself together.kite developer
if you modge podge the board lightly and then while it is wet – modge podge the back of your picture & adhere. Do that for each pic. There is a flat scrapper tool you can get that you smooth over each item and gets the bubbles out. Let it dry well. Modge podge over top. I’ve done this for several furniture pieces that I’ve ‘funked ‘ up and added pictures and paper tokite developer
I did in my 4 yr olds room with wall paper. It was Scooby-Doo, & I couldn’t wallpaper the whole wall b/c we were renting, so I cut out the figures & put them up!! He luved it & made for easy clean up. But, I really luv your ideaqr code
Best 90th Birthday Gift Ideas for Grandma
if you modge podge the board lightly and then while it is wet – modge podge the back of your picture & adhere. Do that for each pic. There is a flat scrapper tool you can get that you smooth over each item and gets the bubbles out. Let it dry well. Modge podge over top. I’ve done this for several furniture pieces that I’ve ‘funked ‘ up and added pictures and paper to
nice post…………..
Hi, Your paper crafting skills are absolutely unmatched and the outcomes are extremely gorgeous. I was recently planning to gift something to my mother on her birthday and this handy little case would be a great idea to give a handmade touch to the presents. This looks absolute fun and I can’t thank you enough for providing such great ideas every time. Darren Wogman
I think I need to hire someone like you to come deck out my house. I’m hopeless at this sort of thing. I know what I like, it just doesn’t get done! Tragic, I know. At least I can dream about someday become more adept at these things Espresso Cappuccino Machines
We sell Grade A of Marijuanna for medication at affordable prices good for chronic diseases and other associated situations like cancer etc and it is better than your favorite free to contact us for more info. https://420kushways.com/
We are supplier of medical Syringes and Gloves in major international market, We have products in Stock with credible supply ability, However prices are affordable so fee free to visit our website: https://stocksyringes.com/ for more info.
It was a good article. It’s almost as if you’re thinking outside the box and putting out such great work in front of everyone. This is truly amazing.
Digital Marketing In Telugu
Suicel, is the natural &eco-friendly material for beauty cosmetic sheet masks, as the founder of super absorbent cosmetic film field, has optimized the super absorbent materials in terms of water absorption, water storage, water locking, permeability, foldability and cost performance ratio.beauty cosmetic sheet masks materials
installation, repair, uninstallation, replacement, damage and other issues. Our dedicated support team is always available at your service and assures you for the quick resolutions. Book geek squad chat today and get your device fixed without wasting much time. Best Monster Truck Show
Hello there, I found out about your blog by means of Google while searching for a similar subject, your site came up, it appears good. Good job on your writeup.
Russian transcriptions
awesome post
I’ve really been wanting to do a collage lately! I was thinking of going bigger and getting the 20 of the same size frame and doing a whole wall. There is something about physical photos in mass that’s incredibly appealing!
-Andrew
I love all these blue and white decorations! Those mini ginger jar ornaments are especially cute, and the wrapping paper is beautiful too. A very helpful blog for me I saw that this blog can never think of such a thing because you have inspired me to try it next year 2021. Everything in your decor looks rich. This is a very good post. Thanks for sharing this blog. click here
Awesome art dear.
Are you looking for a monkey and you are so frustrated finding one? If so you are at the right place We offer you high healthy capuchin monkey for sale.Visit weblink to see available capuchin monkeys. contact us now don’t miss out. https://capuchinmonkey.company.com/
Ребят, кто из вас делает ставки? Где посоветуете лучше ставить? Есть опыт?
We are a small family of Capuchin monkeys located in Illinois we have been breeding capuchin Monkeys for 20years now we have well trained
Capuchin monkeys for adoption visit
https://capuchinmonkey.company.com/ for more information web link
In the Website Building segment, our strategy involves blending in design and development with sustainable practice. In the end, your Business will be able to achieve digital marketing goals with long-term growth. On the other hand, our digital marketing strategy entails merging imaginations technology that will help your brand grow in this age of digital transformation.
Mixpoint is the one-stop solution for all the latest news related to Finance, Technology, Gadgets, Bollywood, Fashion, Lifestyle, Travel, How to, etc.
It is an Easy Square,Jr. It is a clear lucite square with inch marks (and smaller in between) in black print and allows you to align each piece perfectly. I have been using it to setup margins and align pictures I have taken and glued them with Mod Podgr to art canvas.
You have so many fond memories; shouldn t your wall showcase as many as possible? This collage picture frame lets you share twenty eight of your favorite moments with a dynamic arrangement of portrait and landscape images with slim black frames gathered together in a crisscrossing basket -weave design. The layout is already arranged so you can spend the time picking your best snapshots for the vertical and horizontal openings. How you fill the space is up to you! Black and white wedding memories or bursts of color from summer fun. The possibilities are endless and your new unique decor is sure to impress. Multiple hooks allow for horizontal or vertical hanging to best suit your decor needs. Adorn your bedroom or living room space with the story you want to tell. It is a great choice for birthday, wedding or anniversary gifts.
Hello
there, I found out about your blog by means of Google while searching for a similar subject, your site came up, it appears good. Good job on your writeup.
thanks for sharing one the best article
happy birthday cousin message
Когда заводил аккаунт, вел промокод с этого сайта и получил неплохой бонус к первому депозиту, теперь более приятно ставить стало
installation, repair, uninstallation, replacement, damage and other issues. Our dedicated support team is always available at your service and assures you for the quick resolutions. Book geek squad chat today and get your device fixed without wasting much time.SSD Cheap Web Hosting
where to buy premium legit fake id card at https://fakesidstore.com/
I have double front doors that are metal and have been using the old style wreath hangers, but these are so much better! I will buy more for my other metal door on my cabana. I didn’t even know they made these! witneycouriers
Super nice write up and good theme i see here very good … Buy Roxicodone online
nice write up … good theme .. https://tradingossmachines.com/product/monero-crypto-mining-rig/
Staying hydrated is essential for your health, yet many individuals do not drink enough fluids each day. Hydration is important for maintaining blood pressure, body temperature, brain function, nutrition delivery, waste disposal, and kidney health.Welcome to Jason’s Holidays
It’s a great pleasure reading your post. Its full of information I am looking for and I love to post a comment that “The content of your post is awesome” Great work. https://www.wellingtondemolition.co.nz/.
WE AT HYACINTH MACAW FARM SPECIALIZE WITH MACAW FOR SALE
All our Birds for sale are raised in our home. We breed selectively for temperament and health and beauty.We have the healthiest, well-socialized, hand-fed baby birds .
PLEASE VISIT: https://hyacinthmacawforsale.com/
Hand feed hyacinth macaw for sale
Buy Hyacinth macaw online, the large Hyacinth Macaw Anodorhynchus
hyacinthinus is a majestic beauty. Visually it appears to be the
largest parrot in the world. But that is not quite so. The elongated
body of the Hyacinth reaches about 37″ (95 cm) in length and it has an
impressive wingspan up to about 42″ across, which is the most
expansive parrot in the world. But the Hyacinth is not all that hefty,
it only weighs up to about 3.7 lb (1.7 kg). order from Hand
feed hyacinth macaw for sale
Im really impressed!
Keep on posting!
This is a great post. I like this topic.This site has lots of advantage. I found many interesting things from this site. It helps me in many ways.Thanks for posting this again.
At this moment I am ready to do my breakfast, later than having my
breakfast coming again to read more news.
I love this and I have a beautiful old chandelier in the garage I can use. Thanks for sharing. cape verde holiday
Our macaws for sale make a wonderful companion pet. Purchasing a parrot online is easy at MyMacaws. We sell parrots of the highest quality health and basic ability in their DNA. We have a small selection of macaws for sale, Harlequin macaw for sale, Blue and Gold Macaws for sale and Hyacinth macaws for sale. Why not check our website below to purchase a macaw parrot.
https://mymacaws.com
Legit Arms shows you everything related to this world to help you decide on the one that best suits your taste and needs.
Please feel free to visit our website https://www.legitarmsdealer.com/
Awesome post. Thanks for sharing!
I have Male and female pug puppies. They are 12 weeks old. Both fawn, white and black. They have been home raised around children and other dogs. Pug Puppies for Sale Near Me They are eating soft food and started on hard food. They have papers.
Good read, I will share this on.
Guest blogging is a one of the fantastic off page SEO method to develop relationships with other influencer in your field and create your brand awareness. Learn
Why You Should do Guest Blogging
Want to spin and win Paytm cash? Check out spin and win Paytm cash online
Interested to try walk and earn Paytm cash? Get the list of best app for walk and earn Paytm cash
Desire to try you luck with scratch and win Paytm cash? Grab the list of best app for scratch and win Paytm cash
Find out the best app for solve math and earn Paytm cash
EiE88 Situs mpo slot terbaru
Thank you for sharing and nice articles you have here Buy Fluffy Shih Tzu Puppies Online moreover the admin of this site has really worked hard for all this once more thanks for sharing your articles.
It’s awesome that you want to share those tips with us. I assume that this article content is really helpful to me & has a lot of information about Best digital marketing training institute in Bangalore This is definitely the article that I will try to follow. I always search to read quality content and finally I found this in your post. Thanks again I really appreciate you.
Buy fake ID for sale. We offer high quality fake ID to spice up your nightlife. Enjoy the best available id-hurrys.com
Hello
What a post I’ve been looking for, thank you for giving me useful information and please keep posting good information.
I will visit you often. Thank you.
I am also running the site, and its a similar site.
So feel free to check in and explore cause they are helpful and informative.
If you have any questions, please visit my site and read what kind of blogs I am posting. I am sure it will be interesting.
Have a niceday !
https://www.automymo.com
grat
earnmoneytipz
Awesome post. Thanks for sharing!
An impressive share!
Thanks, I’ve just been searching for information about this topic for a long time and yours is the best I have come upon so far.
But, I have more tips that best explain more about the Twitch TV Activation and how to access them freely and easily I’m happy that I found this in my hunt for something relating to this.
You won’t want to miss out, all you have to do is to visit the blog site through the link below.
https://www.automymo.com/twitch-tv-activation-how-to-activate-twitch-tv-on-various-devices
Chemical Solution Medical Store. is a renowned pharmaceutical chemical manufacturer. We can offer high-quality products at competitive prices in quick delivery with 100% custom pass guaranteed. Never stop striving to offer our best service is our philosophy. We have Flexible and Untraceable payment terms. As a leading manufacture, our products have been exported discreetly worldwide.
Chemicals Solution
Visit here Nice Article You Have Here!
Painmeds Online Get more in stock
Royal Honey supplier
buy good quality bills from us
https://www.allcountrybills.com
This is an awesome blog. buy boats online
I really liked the content which is very helpful for me. Thanks for sharing.
We specialize in the supply of the best quality, powders, pills and injectables at relatively cheaper prices. You do NOT need a prescription to order from us. Our prices are very moderate, our packaging and delivery services are fast, cheap, DISCREET and highly secured. acheter dilaudid en ligne
nice post
Hi
power of information operations
on battlefield conditions. Dismissing
conflict would be learning the wrong lessons.
The Biden administration’s campaign
to warn allies—especially Ukraine—has been
covered by major news outlets. While it was
unclear early in Russia’s military buildup
near Ukraine’s borders in mid-
I think that everything posted made a great deal of sense.
However, what about this? suppose you were to create a killer headline?
I am not suggesting your content isn’t solid.,
however suppose you added a title that grabbed people’s
attention? I mean Wall Picture Collage | Bits of Everything
is kinda boring. You should look at Yahoo’s front page and watch how they create post headlines to get viewers to open the links.
You might try adding a video or a related picture or two
to grab readers excited about what you’ve got to say. In my opinion,
it could bring your website a little livelier.
This blog has a way of breaking down complex concepts into understandable and relatable terms. It’s like having a knowledgeable friend guiding you through fascinating subjects. Keep up the wonderful work!
h&m coupons middle east
The empathy and compassion you demonstrate in your writing create a strong connection between you and your readers. Your words have a way of resonating on a deeply emotional level.
teachers discount
I absolutely adore how you’ve combined different elements to craft such a personalized and meaningful piece of decor. The step-by-step guide you’ve provided makes it seem so achievable, even for someone like me who isn’t naturally inclined towards crafting.
promo code hq
scheels coupons have become my compass for navigating the world of sports and outdoor gear. Each time I use these discounts, I’m reminded that I can pursue my passions without compromising on quality or budget. By taking advantage of these coupons, I’ve managed to strike a harmonious balance between my active lifestyle and my financial well-being. They’re not just codes; they’re the key to unlocking rewarding and budget-friendly adventures.
Stumbling upon your blog has brought me immense joy. Your insightful writing resonates deeply with us.
amazing discounts