How did you hook your foam boards together?
I didn’t! I just hung them so close together they were touching- with no wall showing between them.
Did you Mod podge over the entire thing or just the edges of the pictures?
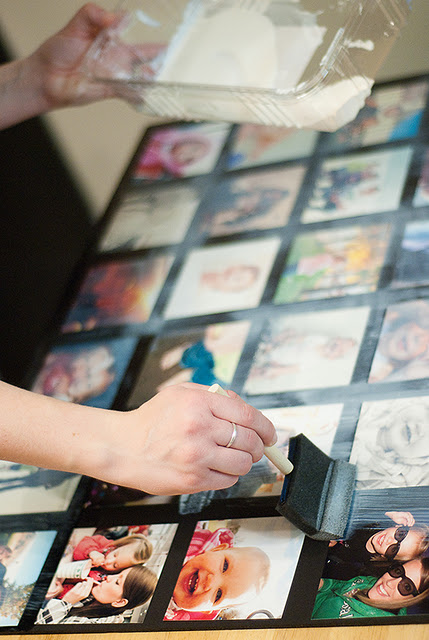
Over the whole thing! It’s scary, but it turns out great.
Did you do matte mod podge later?
Yes! I did end up going over my whole project with the matte mod podge after, and I love it even more now. I would suggest just using the matte pod podge to begin with.
Does the project still look at good, 7 months later?
It honestly still looks as good as the day I did it. No warping of the board or anything.
Could you use the mod podge to glue the pictures down- to eliminate the tape?
I don’t see why not! Maybe I’ll try that next time.
How did you hang it on the wall?
I used damage free hanging command strips that you see in the first photo on the post.
Do the photos smudge when you put the mod podge on?
They didn’t. I had them printed at costco- and they were fine.
What was the double sided tape for?
I used the double sided tape to keep the pictures in place on the board before I mod podged them.
*I should note, that I made one for my mom with old family pictures, and in order to avoid using the originals, we used color copies on photo paper. When we mod podged the pictures, they bubbled a lot. I was told that if I had copied them on card stock, that would not have happened. So make sure to use regular pictures, or card stock!
*When the mod podge initially dries, there will be slight warping in the boards, but once hung on the wall as indicated in the post, it flattens out and won’t be a problem.

Just wondering what sizes all the pics are ?
The small sqaures (2 of them) are 8×8. The bigger squares (3 of them) are 10×10. There’s an 8×10, and an 11×14. The word collage is 10×20.
And in February, I posted another one of my favorite pictures projects– but since we’ve gotten a lot of new followers since then, I wanted to link back to it again. It’s such a fun thing to have! My kids still love to look at it.

Our Shabby Apple Winner is…. (drum roll please)
Erika Hoffmeier

and I liked shabby apple of fb. i love their style.”
Erika, please email us at info@bitsofeverything.com your phone number,
mailing and email address to claim your prize!
We used random.org to select the winner.
Thanks EVERYONE who left us a comment.
We LOVE the positive feedback!
I love this Idea! I have a spot it would look so cute! thanks!
Love Love Love this project!!! I’m going to make one today 🙂 Thanks for sharing!!
I absolutely luv it:) I have tons of pics I keep in an old trunk, but now I am going to put them to good use, thank u very much for the idea:)))
I always look at ideas but never really do them. Well this collage turned out great. Thanks
Just worked on it! I’m excited to see what it looks like in the am!
Looks great! (FYI, card stock, not stalk :))
Uhm, what is that stuff you put over the pictures? And where do you get it from?
To the person above…you can get Modge Podge at any craft store. I’ve even seen it at Walmart in the crafty sewing section near the glue guns at my Walmart. Lots of different kinds, but she says to use the matte I believe.
I am definitely doing this. may need to buy another bottle of Modge Podge as we are still unpacking boxes from moving and I have yet to find mine…lol.
With the photo. Collage using the mod lodge u said something about using the originals? Will it work.if I use my.pictures that I pick up from.walgrerns or walmart? What finish should I use?
I just love this and will dragging out my boxes of pictures to give it a try. Thank you for posting it.
I tried it with my pictures and they smudged 🙁
It is best to use pics printed on a laser jet printer, not ink jet or other processes. You also might want to seal the pics with a spray acrylic sealer first.
What spacing did you do between the photos? When I do the math, I come up with .8 for the spacing on the 20″ side and .86 for the 60″ side. I just wondered what you had done. Thanks!
Where did you buy the foam core board at and how much did it cost?
My comment about using MP to glue down the photos: I say “no” from my own personal experience. I did a project years ago (back in 2005) similar to this and use MP to glue the photo and then MP’d on top of it too. Looked really nice.
Until….
I moved into an older home with no central AC last spring. The humidity did a number on the photos and they have started to peel away. It’s totally fixable, but a pain considering the work you put into it.
So, yes! This does work! But…if you’re living in a home with problems keeping the humidity under control, just be aware that you might want to use a stronger tape/glue/something to keep them secure.
Where do you find the foam core board at in the store? Is it in the craft section.
Just finished mine, and before hanging, I have to say I’m almost wishing I’d used the gloss. I don’t know, I don’t have much experience with mod podge, but I’ve used gloss on one other project and didn’t get the streaking (like when you paint with a hair brush or something, not the photos actually streaking) that I did with the matte. Oddly enough, I did have a few photos have some color distortion, mostly in browns in the background or the green in some grass, but the rest nothing, so I have no clue what actually caused that. I thank you soooo much for the idea!!! I have a ton of photos and no frames. Can’t wait until hubby gets home tomorrow night so we can find a place to hang it.
Hey does the satin mod podge work as well as the matte? I’m doing an art project, and I have one shot on getting it right
Great idea!!!!! Cute too!!!!!
I wonder if this would work on a stained plywood board?
I am wandering the same thing. Please if anyone has tried it with the plywood please let us know if it turned out! Thanks
Yes, you can do it on plywood. You won’t be able to hang it with the command strips though. You will want to be sure it is sanded smooth first.
Foamcore can be found at Staples, and probably craft stores. My question is how did you hang it? I work with foam core everyday and it’s not the easiest stuff to hang.
She hung it with command strips. It says so in the original post. A couple tricks I saw for hanging light objects like this is to glue pop tabs or paperclips to the back top corners. Glue just the bottom and bend the top part so it sticks out a little so you can hang the hole over small nails.
How thick did you put on the modge podge? It looks really white on the pictures. Should you see the brush strokes when it is wet or should it be more even? Is it just one brushing or did you go over it a couple of times with the wet brush?
Mod podge always goes on white, but dries clear. It is best to put on 2 or 3 thin coats letting each coat dry in between.
Card STOCK, not ‘stalk’
Great idea
I tried this some time ago, and my pictures smeared. I printed the pictures from my photo copier on photo paper and they dried for a few days before I tried this. I’m wondering if having them printed at a place like Walmart makes a difference. Anyone have this same issue?
Make sure to have your pics printed with a laser jet, NOT an ink jet!! Ink jets will always smear no matter how long they have to dry/set. If you have to use ink jet use a spray acrylic sealer over the pics first and make sure it is dry before you apply the mod podge.I would suggest trying on an extra print before you put the effort out to do the entire project. If you have questions about using mod podge contact Amy from modpodgerocks.com. She uses the stuff every day and has always had answers for me.
how did you put the two foam core’s together? I love this project. awesome idea. thanks so much for sharing.
She said she just hung the boards very close to each other but did not physically connect them.
I luv it! it looks great. I’m going to try it all of my pictures in my drawers.
I recently tried this, and the matte pod podge left streaks all over my photos. I used the sponge on method, and did it with a pretty light coat, but some of the pictures just look terrible. I used prints from Wal-Mart that I had had for months, so I wouldn’t think it was the quality of the picture. I am really disappointed and would like to try this again, but not at the risk of ruining another 48 pictures. :/
if I don’t leave spaces in between the photos do you think they’ll warp?
I don’t think the spaces should make a difference. Good luck!
I think it’s WONDERFUL and I will definitely have to do one for each of my 4 grown kids…….thanks for sharing 🙂
I used one large picture, taped it to a canvas, used the modge podge and it warped. I did it just a few minutes ago, so I’ve yet to see the actual finished project, but I’m worried it won’t stay down, and I’m also concerned my pictures are going to smear a little. It looked like it was starting to.
This is a fantastic idea … great way to make a collage of pics. The only thing I would like to say is that being a framer for over 10 yrs and very familiar with foamcore is that Foamcore without a solid backing WILL WARP after a period of time and under different weather climates – I would FRAME YOUR FINISHED PRODUCT before this happens or attach to a solid backing!
I loved your idea and I just did it, even though those boards are way too expensive here in Germany one costs like §24. Anyway I tried to follow your instruction but the modpodge dried all out but it still looked streaky like in the picture were you first applied it. I assume it’s because I did two coats of mod podge.
I’ll try it again hopefully it will turn out better.
Katja
I used gloss, Is that a bad idea?
I love this idea. I pencil color pictures and do the same thing you can pick a frame color with scrapebook paper to match it.
I’d like to use this as a table top. What sealant can I use to ensure that the top doesn’t scratch. I don;t want the pictures to scratch!
I printed my photos on glossy card stock, the same used to print photos in labs, but for some reason my pictures bubbled something awful after I painted the MOD PODGE over them. I used the double sided tape first to place them, I am not sure where I went wrong, but I love this idea and any tips would be great. I followed your directions, but mine did not turn out so great lol
Can you use modge podge on printed paper photos? I am putting them on block letters for my sons graduation. Thanks
Such a brilliant idea and inexpensive I am so stealing this idea ….THX