Summer is the perfect time to sew! Sewing things for your kids and family or WITH your kids can always fun. I’m so excited to be included in the Summer Sewing Series with Polka Dot Chair. There are some great ideas this year! Today I’m showing how I made my new Pool Bag. I just got it made and I can’t wait to take it to the pool to try it out.

 Let’s get started! Here’s what you need.
- Fabric – 1 yard of thick fabric that is 60 inches wide. I bought this cute striped fabric at Ikea for under $8 a yard!
- Thread
- Straps (optional) I used 60 inches (30 for each strap) but you can make them longer or shorter. You could also use leftover fabric.
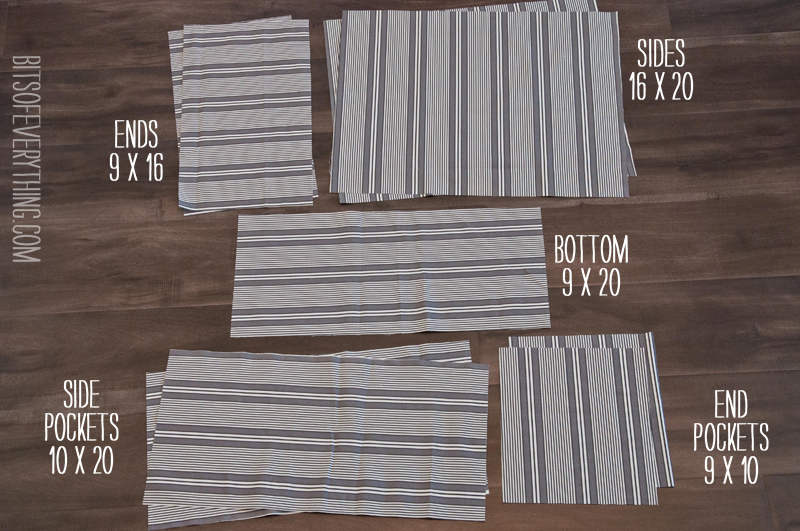
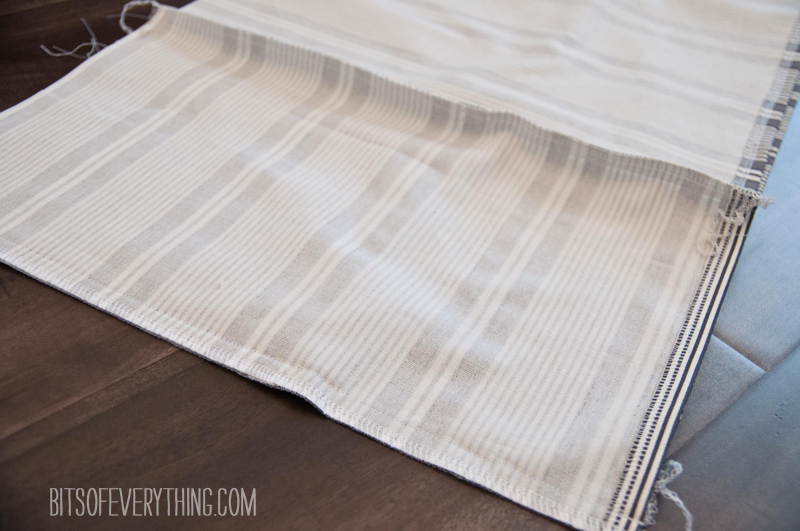
Cutting – Cut 2 sides, 2 ends, 1 bottom, 2 side pockets, and 2 end pockets. See measurements above. I have coordinated which way my stripes go, so pay attention to that if you are working with stripes.
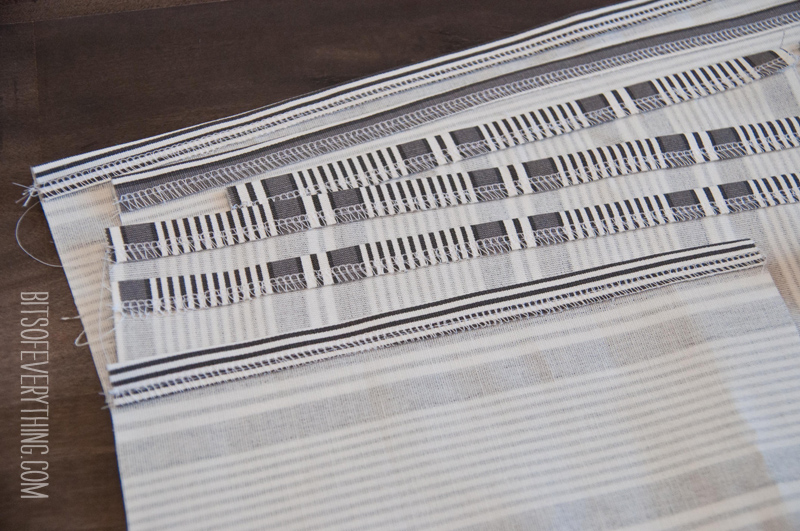
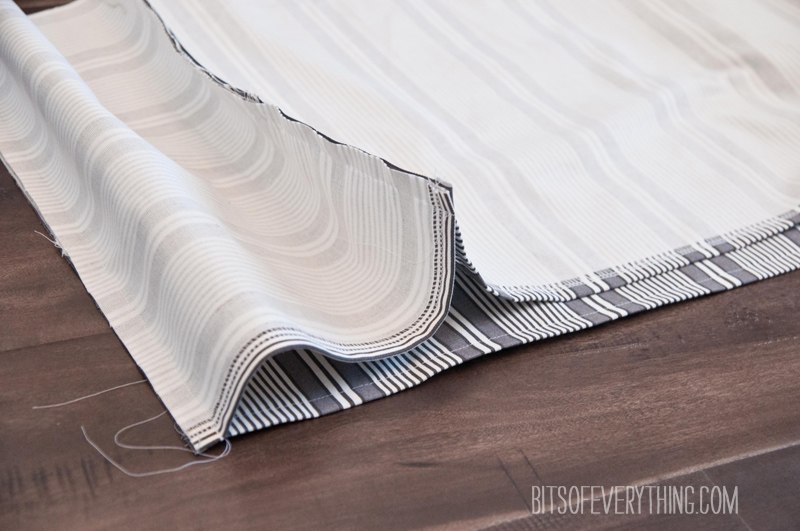
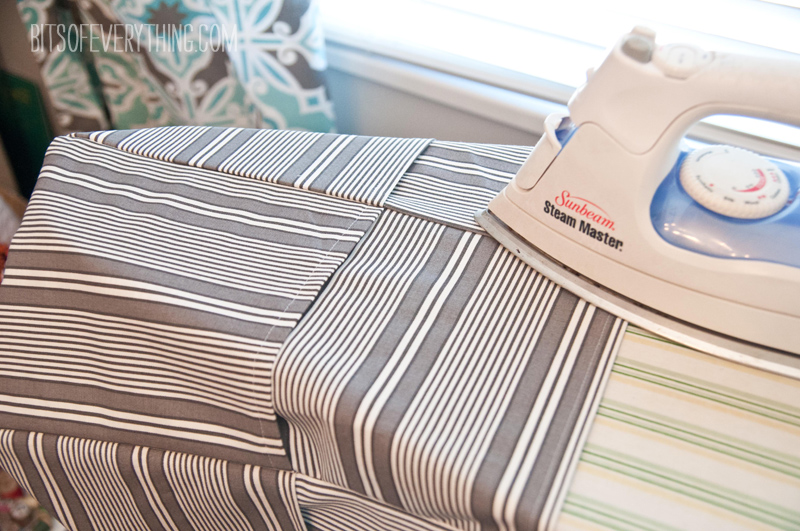
Hem the top edge of all the pieces EXCEPT the bottom piece. My favorite way to hem is to serge the edge and fold it over once. I folded it over 1/2 inch and then sewed it down. If you don’t have a serger, you can alway zigzag the edge OR roll your edge under (fold over 1/4 inch and then fold over another 1/4 inch.)
 Pin your pocket pieces onto all the bag pieces (except the bottom piece).
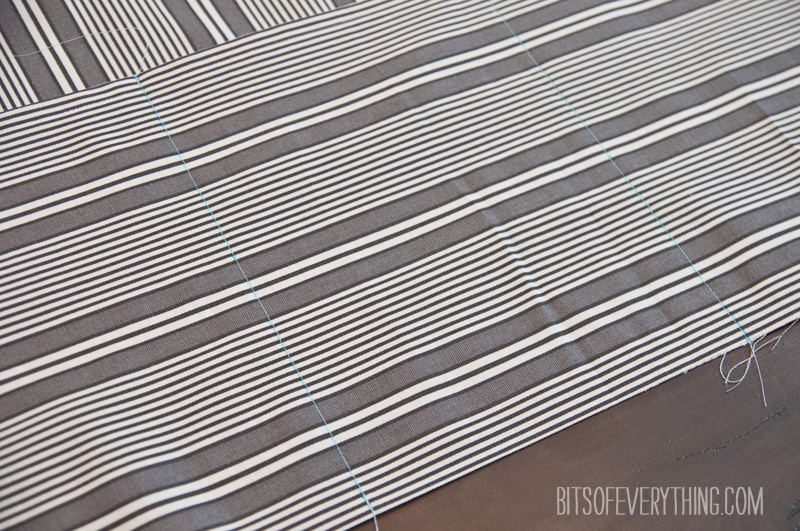
Mark and Sew where you want your pockets to be on the side pieces. I chose to have 3 pocket sections on my long sides of the bag. I marked my pocket lines 6.5 inches in from the edges.
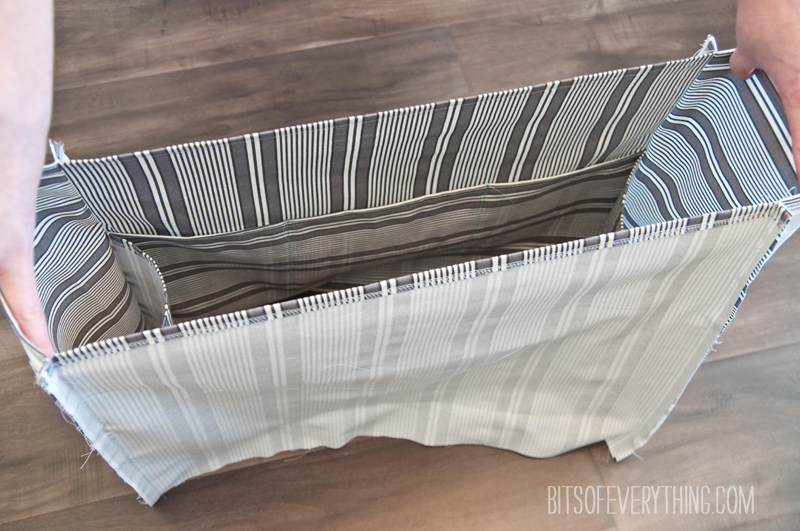
 Sew your bag sections together with right sides together. Sew in this order: End, Side, End, Side, and then hook your first end piece to your last side piece.
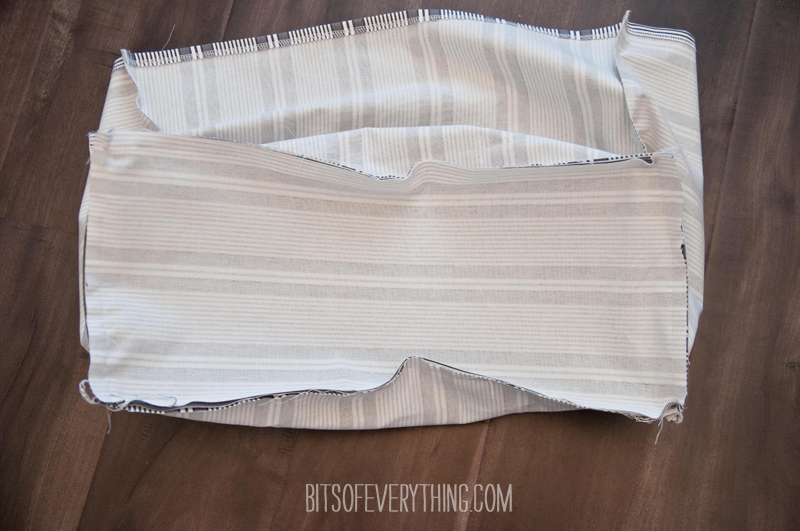
 Your bag is coming together! This is how it should look now!
 Serge or zigzag your inside seams to help prevent fraying.
 Pin and Sew your bottom piece into place. This is the trickiest part. I like to sink my needle and pivot each time I hit a corner seam. My seam along the bottom looks like a big rectangle. I also serged the edge of this bottom seam to finish it off.
 Turn and Press – Turn your bag right side out and press your corner seams to one side. You are almost done!

Handles – Using the handle material, cut each handle to be 30 inches long (or your prefered length). Pin into place. I measure in 4 inches from the corner seam.
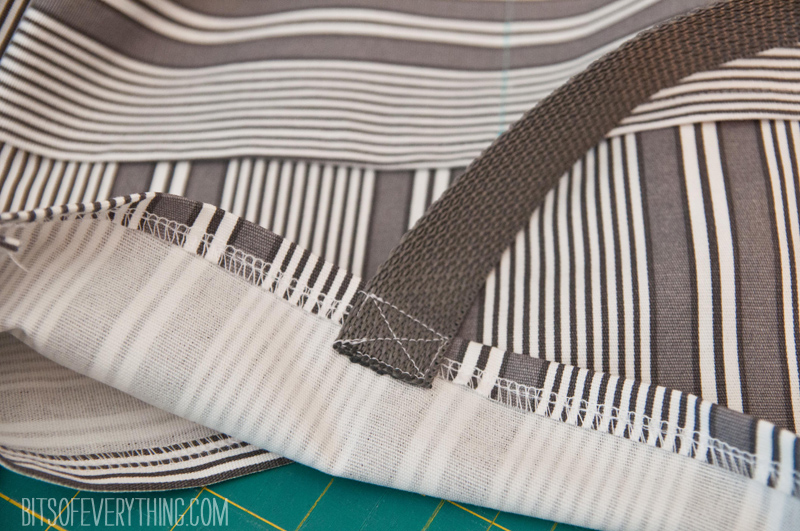 Reinforce seam so that your handles are nice and strong!
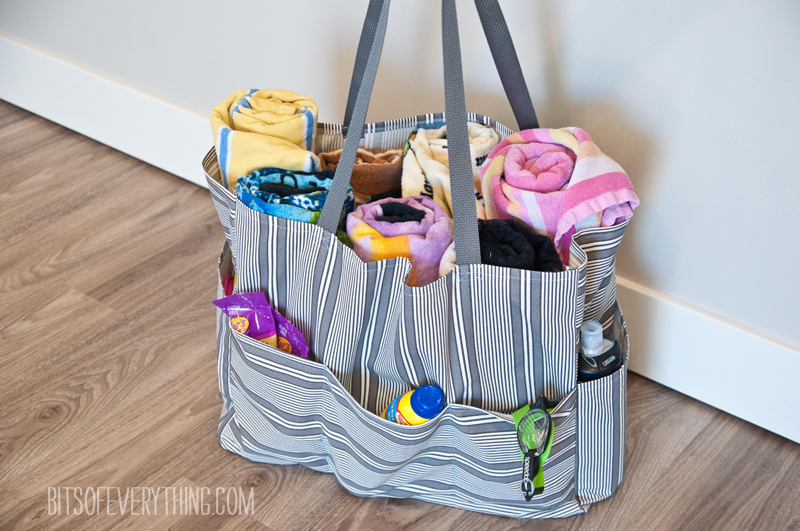
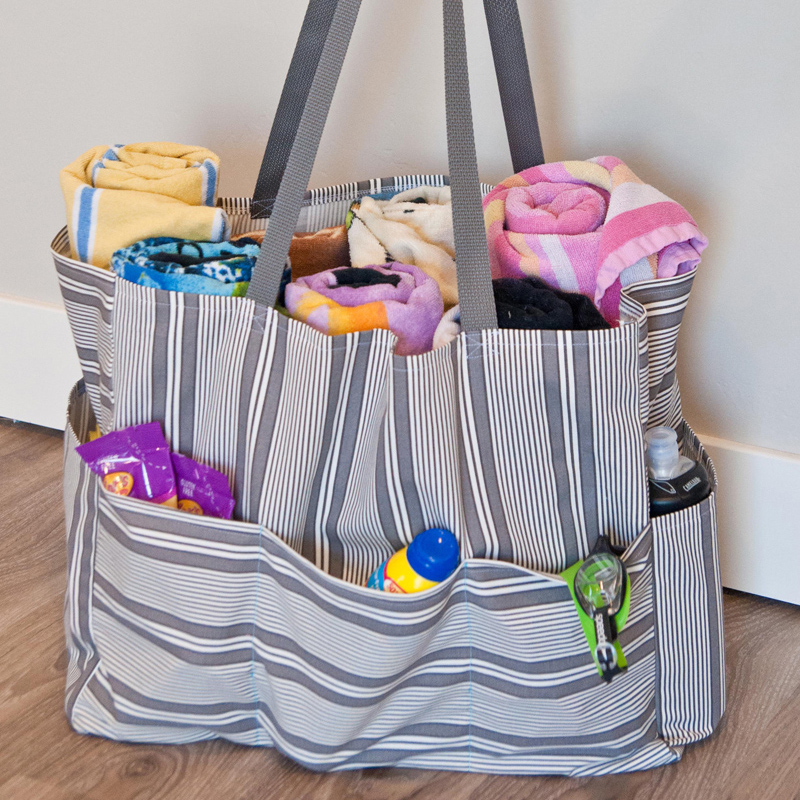
Load up your bag! I love all the pockets around the sides. I use them for water bottles, sunscreen, goggles, snacks, pool toys, my phone, and wallet. Nothing gets lost at the bottom of the bag anymore! I hope you love your bag as much as I do.
Cute bag! Thank you for this very good and most inviting tutorial!
Greets from Austria!
I love my new bag!! I am a begginer and I found it very easy to follow.
Thank you!!
Very cute bag and well done tutorial. I only have 44″ wide fabric (quilting fabric) right now so would I need a yard and a half? I could make the pockets from scraps of a coordinating fabric. The possibilities are endless!
Thank a lot! I did it with an inside pocket.
Have a look on the comment of that post, if you want to it.
https://www.facebook.com/PetitCitron/posts/10153830629563215
Excellent tutorial. Turning this into a sewing bag.
Hi. Thank you for doing this blog.
Thank you!! Made a pool/beach bag for my most recent vacation and it was easy to follow and the bag was perfect. So much room for all the items my family needed. It fit all our water bottles and various sun blocks and a ridiculous amount of toys and snacks.
Your webpage is truly great. I drew on a lot of its material.
https://crackbye.com/spyrix-free-keylogger-crack/
So excited to make this bag! I’m going to make it as my sewing bag (as someone else said in the comments) and use coordinating frabric for the pockets (as someone else suggested. Your tutorial is amazing! Then I might make another one as anteachinng bag. This bag looks so versatile with the multitude of pockets.
Hi,
Love this tutorial, I was just wondering, how did you lay out the pieces on the fabric when cutting out? 🙂
I have read so many good reviews in your site. I believed that you deserved this 5 star. Keep it up 유로88
Could you use a vinyl tablecloth and outside waterproof?
My Hobie Cat sail has been retired. Many memories.
I want to use that material for this bag.
It’s a thick Dacron.
And I’d like to use nautical rope for the handles.
Who wants to make it?
North Shore Chicago.
calbrecht@point-management.com
These handmade pieces, which are so exacting and thoughtful, truly appeal to me. It encourages me to learn how to produce my the backrooms own goods.
A vinyl tablecloth could be useful, and it’s also weatherproof.
Hey nice post. Good work. Please visit.
Madan Yoga article also.
Its useful for you too.
Hey nice post. Good work. Please visit.
Yoga Teacher Training in Nepal article also.
Its useful for you too.
Hey nice post. Good work. Please visit.
200 Hrs YTT Course in Nepal article also.
Its useful for you too.
Hey nice post. Good work. Please visit. Smart Care.
Yoga Classes in Nepal article also.
Its useful for you also.
Hey nice post. Good work. Please visit. Smart Care.
Yoga Tour in Nepal article also.
Its useful for you too.
Hey nice post. Good work. Please visit. Smart Care.
Nepal Yoga School article also.
Its useful for you too.
Hey nice post. Good work. Please visit. Smart Care.
Best Yoga Retreat Training in Nepal article also.
Its useful for you too.
Hey nice post. Good work. Please visit. Smart Care.
Yoga Treks and Tour in Nepal article also.
Its useful for you too.
Hey nice post. Good work. Please visit.
Hindu Priest article also.
Its useful for you too.
Hey nice post. Good work. Please visit.
Best Hindu Priest in London article also.
Its useful for you too.
Hey nice post. Good work. Please visit.
Rice feeding ceremony article also.
Its useful for you too.
Hey nice post. Good work. Please visit.
Naming the Child article also.
Its useful for you also.
Hey nice post. Good work. Please visit.
Baby Shower article also.
Its useful for you too.
Hey nice post. Good work. Please visit.
Hindu Griha Pravesh Puja article also.
Its useful for you too.
Hey nice post. Good work. Please visit.
Hindu funeral rituals article also.
Its useful for you too.
Hey nice post. Good work. Please visit.
About Us article also.
Its useful for you too.
Hey nice post. Good work. Please visit.
Blog article also.
Its useful for you too.
Hey nice post. Good work. Please visit.
Galleries article also.
Its useful for you too.
Hey nice post. Good work. Please visit.
Contact Us article also.
Its useful for you too.
Holly, I retired a few years ago and started sewing. I’ve probably made75-80 of these Pool Bags and given them as gifts over the years. My first ones were “rough” but getting better all the time. I hunt for outdoor (sunbrella type) fabric on clearance as there are so many fun designs. Thanks for the fun pattern! I’ve tried others but always come back to this great pattern and everybody LOVES them!
This article provides an excellent tutorial on how to make a pool bag for the summer season. The step-by-step instructions are easy to follow, and the end result is a practical and stylish bag that’s perfect for carrying all your pool essentials. If you’re looking to get into sewing or just want to try out a new project, this tutorial is a great place to start. See more of their fun and creative sewing projects on their website!