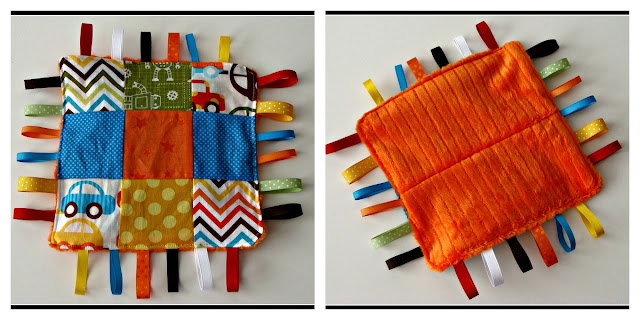
Here is a Tag Blanket Tutorial! These have become my new favorite thing to make for baby gifts!
What a great way to use up scraps!
Supplies Needed:
Scrap fabric
Assorted ribbons
One empty baby wipes package
Let’s get started!
Cut ribbons into 4″ pieces.
Cut 9 – 3 ½” squares for the front.
Cut 1 – 9 ½” square for the back.
I have found that flannel for the front and minky for the back works great!
But it will work to use whatever you’ve got.
(Just make sure you don’t have white cotton fabric on the front, or you may see the wipes package through it!)
For this one, I chose regular cotton fabric for the front and minky for the back.
(I had to piece two pieces of minky together to make the square for my back. I love using up scraps!)
Step #1 – Make your 9 Patch
Use a 1/4″ seam allowance.
(Don’t forget to “nest” the seams when you iron! See image below.)
Step #2 – Add Ribbons
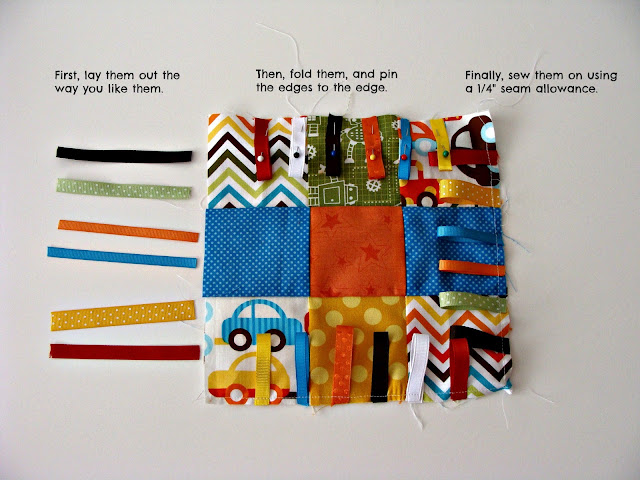
Place the ribbons where you want them.
Fold the ribbons in half, pin them, and then sew them on using a 1/4″ seam.
(I like to do this one side at a time.)
Caution: Don’t put ribbons too close to the corners.
I made that mistake on my first one, and it looks like this:
Step #3 – Stack Layers and Sew Together
Stack the layers together.
Place your back square face down on top of your front 9 patch
(so the right sides are together) with your wipes package on top.
Line them up, and pin in place.
Flip the stack over and sew around just inside the 1/4″ seam you did to attach your ribbons.
Don’t forget to leave a 3″ opening for turning!
Be sure to catch your wipes package in two seams – one on each side.
Yes- actually sew it in the seams! This way it is suspended in there.
If your package is bigger than your blanket, trim the excess off the sides.
Step #4 – Turn Inside Out and Top Stitch Around
Turn your blanket inside out.
Use a 1/8″ seam allowance and top stitch around.
Be sure to securely close the 3″ opening.
Ta Da!
Now you can experiment on your own and do it however you like!
In the picture above, I made each of them a difference size.
The one on the left was made with 4″ squares to make the 9-Patch, the middle one was 3 1/2″ squares, and the one on the right was made with 3″ squares.
Each one is made with the empty wipes package inside to make that magical sound!
These are machine washable – but don’t put them in the dryer because of the plastic inside!
Special thanks to Sew Much 2 Luv for her tutorial that inspired mine!
Linking up here:


Graham would love these! Awesome, Ash!
How adorable… you’ve serious skills! Pinned! I’m so glad you came to share at Super Saturday Show & Tell… come back again next week to party with me again 🙂 xoxo~ Ruthie
Love these! Would make great baby shower gifts.
Pinned this! Can’t wait to give this a try!!
It was delighted to find this web site.I wanted to thank you for your time reading this wonderful! I really enjoyed every bit of it and I’ve marked to ensure that the blog post something new.
When it involves any occasion, it’s special for you. you wish to create it as special as doable. one in every of the primary joyous celebrations of your life is wedding. you wish to please everybody; the most effective man could be a special a part of such an incident.
Thanks.
Geburtstafel Abolen
I love this idea–thanks for sharing it! I just wish I weren’t so afraid of my sewing machine!!! (A comment I make every time I see something cute that’s sewn…)
Love this! It took me forever to figure out what makes the crinkly sound. Glad you included that super secret part in your tutorial. The bags that cold cereal comes in work great too. My kids laughed when I was trying out new materials and would have them close their eyes for sound testing!
I saw your tutorial from Ginger Snap Crafts oh so big linky party! I’m co-hosting and pinned your project. Thanks for sharing.
I love these tag blankies. Your’s are very cute and I love the textures. Thanks for sharing.
I’d love for you to check out our Pattern Party! Those with free patterns and templates to share are invited to link up! We also have a great giveaway for Free Patterns!
The birth of a baby is a special event which requires special gifts. Baby gift baskets are the most common presents that are offered in these occasions.
Thanks.
Geburtstafel Holz
I chose regular cotton fabric for the front and minky for the back. It took me forever to figure out what makes the crinkly sound. Glad you included that super secret part in your tutorial. The bags that cold cereal comes in work great too. I wanted to thank you for your time reading this wonderful! I really enjoyed every bit of it and I’ve marked to ensure that the blog post something new.
african american christmas ornaments